
This week’s blog continues our discussion of preparing for the upcoming beekeeping season. If you ordered bees to increase your numbers for next season, you will also need to be prepared with extra hive bodies. Hive bodies come in a variety of styles but in Atlantic Canada, and particularly for beekeepers engaged in the pollination industry, the Langstroth hive is standard. Read on to join ATTTA in the assembly of a standard Langstroth hive body!
Assembling a Hive Body
Large scale beekeepers in Atlantic Canada tend to make their own equipment to reduce costs. If you are considering scaling up, assembling your own hive bodies is a good place to start because it does not require advanced carpentry skills or specialist equipment. We recommend using 10-frame Langstroth hive bodies because they are most typical in Canada and therefore are the most accessible. The standard width and length for a Langstroth hive is 161/2” x 197/8”. They are available in various depths depending on preference and purpose. Brood chambers are typically deep (95/8”) and honey supers are commonly medium or shallow ( 65/8” and 53/4” respectively). Today, we will be assembling a deep hive body.
The first step is to gather your materials. Unassembled hive bodies are available at most local beekeeping equipment stores. Some come ready with predrilled holes in the finger joints and nails included. Ours did not, so we also have a box of 2” galvanized nails and a drill. We chose to use nails to construct our box, but screws or air gun staples are also appropriate depending on preference and access to tools.
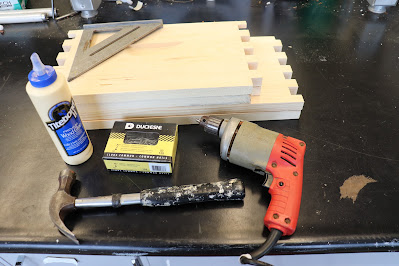
Now we are ready to predrill our holes. Predrilling is not required but is recommended because it will help protect your wood from splitting, and the holes will guide your nails into position. Drill one small hole in the center of each finger, for a total of 40 holes to be filled with 40 nails. Another optional resource is wood glue. Wood glue offers additional binding strength to your corners and can act as a sealant to help keep out moisture, like human propolis! Add a thin layer of wood glue to the top and bottom of the fingers before joining them together. Glue can be easily spread using your finger, some scrap wood, or a popsicle stick.
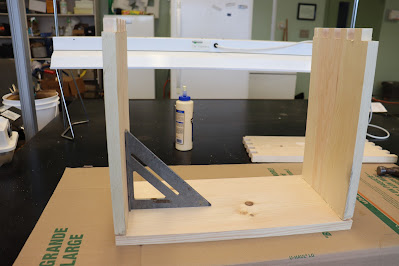
The next step is joining your corners and adding the nails. Start with one of the pieces flat on the table with the inside of the box facing up. Then add the first two sides, ensuring all of the handles are oriented in the proper direction and facing outwards, and place your fourth piece on top. You will need to apply some force to get the corners of the box flush and square. A rubber mallet can be useful, otherwise you can gently hammer or use your body strength alone if the joints are not too tight. It is good practice to check the sides and make sure they are square before you begin to add nails, and with precut walls the box will likely square up quite easily. Clamping of sides may also be helpful when you start out to ensure a good tight fit all around.
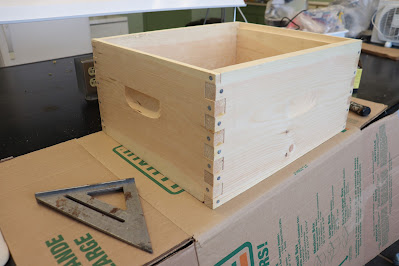
Once all four sides are in place and the box is good and square, you can begin nailing the sides together. As an additional optional step, some beekeepers will nail the corners of the hive vertically to prevent warping. The corners are the most important part of the hive to keep in place. This ensures it remains square and the correct dimensions. Outward warp of the corners will affect the alignment of supers, bottoms and covers. If you are building many hives, consider ear protection to block out noise. With all the nails in place and any excess glue removed, your hive body is complete and ready to paint! For more information about best practices for painting a hive, see ATTTA Blog #45!
Having extra hive bodies on hand is very useful in an
apiary. They are necessary for housing bees and can also prove useful in pail
feeding, catching swarms, making splits, concealing electric fence energizers.
This past spring, Atlantic Canada had an early swarm season and beekeepers with
hive bodies and extra equipment ready to go were in a much better position for
swarm management. Planning ahead and preparing your hive bodies in the winter
is a good beekeeping practice. This is especially important given the realities
of COVID-19, as supply-chain issues may impact access to beekeeping equipment
and other materials, including lumber.
Connecting with ATTTA Specialists