Showing posts with label Langstroth hive. Show all posts

Overwintering in Polyurethane Hives

Thursday, 12 January 2023

In Atlantic Canada, honey bees (and beekeepers!) endure long winters. Many of us wrap and winterize standard Langstroth hive bodies with different insulating materials to help colonies survive the cold winter months. However, what if it was possible to house our bees using a more insulating material all the time? Beekeepers currently have additional options and a choice of technologically advanced materials for housing colonies. One such novel material is polyurethane honey bee hives.

Overwintering in polyurethane hives

Polyurethane hives are an alternative to traditional, wooden Langstroth bee hives. Similar to Langstroth hives, polyurethane hives use standard size, removable frames in vertically stacking bodies. They are advantageous because of their lightweight, insulating walls. High insulation value offers potential to support honey bee colonies kept in cold climates. During the winter, colonies are primarily focused on regulating cluster temperature at around 34-35°C. This is an energy demanding task, at a time during which foraging for food resources is not possible. Supporting colonies with insulation can reduce energy needs, much like insulating a home reduces heating costs. This can extend food stores, which is a great relief in the spring when beekeepers are anxiously awaiting the first nectar bearing flowers.

Researchers in Maryland recently performed a study to compare the overwintering capacity of polyurethane hives with standard, soft-wood Langstroth hives (Alburaki and Corona 2022). Eighteen double deep, 10-frame hives, evenly divided between polyurethane and wooden, were standardized for bees and food stores before the winter period from December to March. Sensors were placed within each hive to monitor temperature and humidity, not of the honey bee cluster, but of the surrounding hive cavity.  Polyurethane hives maintained significantly higher internal temperatures than wooden Langstroth hives, as well as less drastic temperature oscillation between day and night. Polyurethane hives had an average temperature of approximately 10.20°C, compared to unwrapped, wooden hives at 9.73°C. During the monitoring period, outdoor apiary temperatures ranged from -10 to 20°C, with an average of 0°C.  

Another challenge for honey bees in the winter is maintaining optimal hive humidity. Polyurethane hives maintained an average humidity more preferable to honey bees at 52.05%, compared to 63.50% average humidity within wooden hives. Polyurethane hives have vents in the top and bottom that provide valuable airflow. Comparatively, the wooden hives revealed a wider range of humidity between night and day, demonstrating wood’s propensity to absorb moisture during cold, nighttime temperatures and then release moisture as the day warms. Such oscillation of internal conditions may cause honey bees to use more energy to maintain an optimal environment, thereby consuming more food. 

It is important to recognize that the Langstroth hives in this study were not winterized. In preparation of long, cold winters it is typical for Atlantic beekeepers to insulate hives to some capacity, whether it is a foam board between the inner and outer cover or bubble-wrap around the outside hive body. Though this study does not provide insight as to the advantage of polyurethane hives compared to wrapped, insulated Langstroth hives, it does present a modern option for overwintering colonies. Polyurethane hives may be an alternative technique for northern beekeeping, in which external wrapping during the winter is not necessary. 

Ben Cornect’s nuc yard. Polyurethane nucs are organized as six per pallet. ©ATTTA

At the Atlantic Bee Tour this summer in Nova Scotia, we saw an example of one beekeeper who is already taking advantage of the high insulating properties of polyurethane bee hives. Ben Cornect showed beekeepers his nuc yard, where he has begun successful experimentation with overwintering nucs in polyurethane hives! As innovation in beekeeping continues, it is worthwhile to consider your own operation and how new technologies might serve your beekeeping goals. 


References

Mohamed Alburaki & Miguel Corona (2022) Polyurethane honey bee hives provide better winter insulation than wooden hives, Journal of Apicultural Research, 61:2, 190-196, DOI: 10.1080/00218839.2021.1999578


Connecting with ATTTA Specialists


If you’d like to connect with ATTTA specialists or learn more about our program, you can:


Alternative Hive Options in Atlantic Canada

Thursday, 9 June 2022

There is a lot to think about when you first start beekeeping. An important decision that needs to be made is what type of hive to use. This decision usually depends on what kind of beekeeper you want to be and for what purpose you will use your bees. Some hives are best suited for honey production, others are good for pollination, and some are perfect if you want to have easier access inside your hives.  The Langstroth, Top Bar, Warré hive, and Flow® Hive will all be discussed to help determine which is right for you.

Alternative Hive Options in Atlantic Canada

Langstroth Hive

Langstroth hive: https://www.almanac.com/beekeeping-101-types-of-beehives

The classic Langstroth hive, designed and crafted by Lorenzo Lorraine Langstroth in 1852, is the most common beehive style in Atlantic Canada. This hive can be built with minor differences but usually consists of a bottom board that provides an entrance and stability, an inner and outer cover, and middleboxes commonly called supers. These supers come in three different sizes; deep, medium, and shallow. By stacking new supers on top of existing ones, you can expand your hive, giving the colony room to grow. Inside these supers, there are ten removable frames with foundation on which the bees build comb. The Langstroth hives allow the keeper to inspect the colony and observe brood, honey production, and overall hive strength.

Top Bar Hive

The Top Bar hive has a much different appearance than the Langstroth. Its box is approximately three feet long and raised from the ground to be at a more comfortable height for beekeeping. This type of hive gets its name from the bars at the top, which replace the need for frames. These top bars allow the bees to build their combs without foundation. This type of hive allows expansion horizontally with the following board moved as additional space is required by the colony.  

Warré hive


The Warré hive is a combination of the Langstroth and Top Bar hives. It was designed by a French monk named Abbé Émile Warré. Warré created his hive to more closely mimic hives that are found in nature. It uses the top bar design to allow the bees to develop their own comb. This system also expands vertically using supers. However, unlike the Langstroth hive, the supers are added to the bottom of the existing hive. By doing this, it encourages the bees to build new combs downward. While adding the new supers to the bottom, the top supers can be removed to filter out the old combs and keep the hive clean. This hive can be low maintenance and collecting honey from the removed top supers is relatively easy. 

Flow® Hive

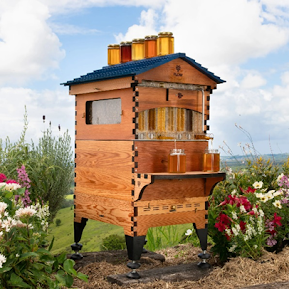
Flow ® Hive: https://www.honeyflow.com/products/flow-hive-2-plus

A newer hive on the market is the Flow® Hive. It was introduced to Canada in 2015 by Stuart and Cedar Anderson from Australia. It is designed to allow easy collection of honey. Much like the Langstroth hive, the Flow® Hive uses supers containing ten frames. However, these frames have mostly completed cells, made of plastic, already in place for the bees to fill. When it comes time to harvest your honey, you can drain the honey without entering the hive, using specific hive tools. As this hive was initially designed for an Australian climate, its minimal use here in Atlantic Canada has not provided the opportunity to fully prove its adaptability to our winters!

These four hive styles all create a perfect home for honeybees. The best one for you will depend on what you plan to do with your hives and your preferences. However, for beginners, the Langstroth hive may be a good bet. In Atlantic Canada, Langstroth equipment is widely available, relatively inexpensive, and well established. This familiarity will provide available support and advice from mentors and other beekeepers.  So, Langstroth equipment will be easier for new beekeepers while they are learning all the ins and outs of apiculture.  Typically, your first bees will arrive as a nucleus colony, or nuc, ready to be established in a Langstroth hive.  The Langstroth hive is also what is used for pollination services.  So, if this is a current or future consideration, this style of beekeeping is recommended.

Written by Rebecca Campbell, ATTTA Summer Research Assistant rcampbell@perennia.ca


Connecting with ATTTA Specialists

If you’d like to connect with ATTTA specialists or learn more about our program, you can:


Wiring Frames

Thursday, 10 February 2022

This week, we will pick up our discussion from last week’s blog by preparing our Langstroth frame to hold foundation. Foundation is important as it ensure that bees draw comb within the frames and reduces the amount of drone comb production.  This means a more productive hive with a greater number of worker bees and frames which can easily be removed for inspection. We are using wax foundation in our frame, so we will start today by adding wire support!

Wiring Frames

As always, we will begin by gathering our materials. We have our frame from last week, a sheet of wax foundation, a homemade wooden frame jig, frame wire, eyelets, ¾ inch nails, a loaded brad stapler, hammer, and optional needle nose pliers and razor blade. We also have a larger nail to take the place of an eyelet punch.

Start by adding one eyelet to the outward facing side of each of the holes in the sidebars and securing them into place. This can be done simply by pressing them in with an eyelet punch, or, if you have misplaced your punch, use the head of an upside-down nail and a hammer. Eyelets protect your wood from the wire that runs through the holes.

Now you can place your frame on the jig. A jig is a useful tool for securing the frame as you tighten the wire, although frames can be wired without one. First, add two nails which will secure the ends of the wire. One nail can be positioned just below the bottom hole of the side bar and the other can be positioned just above the top hole.

Feed the wire, directly from the spool, through the top hole of your frame. Draw it horizontally across and through the opposing hole, then down, through the next hole, and across again. Follow this pattern through to the final hole where the end of your wire will end up next to the bottom nail. A jig will likely have pieces to loop your wire around as you move down each level. 

Once your wire has gone through all eight holes and you have four lines across your frame, the wire can be secured around the nails. Wrap the end piece around the bottom nail and hammer it flush. Cut the wire, leaving some to grip, and wiggle the remaining tail free to create a clean break at the nail.

With one end secure, you can now tighten the lines by pulling down on each level with your hand and rolling excess back onto the spool. Start with the bottom row and work your way up. Firmly rotating the spool can also help to create taut lines. The wires should be tight enough to pluck a tune. Once the wire is tight throughout the frame, you can secure the other end around the top nail in the same manner as the bottom.

Now your frame is ready for a sheet of wax. In next week’s blog, we will add the foundation, embed the wires, and discuss some good reasons to keep your comb fresh!

Job Opportunities

ATTTA is looking for a summer research assistant to assist in our field work this season! Click here for additional information, we look forward to hearing from you!

There are additional job opportunities within Perennia, as well! Click here to discover more!


Connecting with ATTTA Specialists


If you’d like to connect with ATTTA specialists or learn more about our program, you can:


Frame Assembly

Thursday, 3 February 2022

In today’s blog, we will be discussing another important piece of hive equipment to prepare for the coming season - frames! Frames of some variety have become essential to modern day beekeeping. Removable frames allow for hive inspections which are valuable for pest and disease monitoring and, in Canada, are the law in beekeeping. Today, join us in assembling a deep frame, to fit the deep Langstroth hive body we assembled previously. 

Frame Assembly

When organizing frames for the upcoming season, you first must ask yourself what kind of frame you would like. Frames for Langstroth hives come in different sizes and materials. Shallow frames fit shallow supers, medium frames fit medium supers, etc. Frames can be wooden or plastic. In Atlantic Canada, it is most typical for frames to be wooden with either plastic or wax foundation in the midrib. Frames which are one piece and completely plastic are also available but, anecdotally, less hardy. Frames can be bought assembled with foundation in place, unassembled, or you can start from scratch. Today, we are assembling a wooden frame which is intended for wax foundation. 

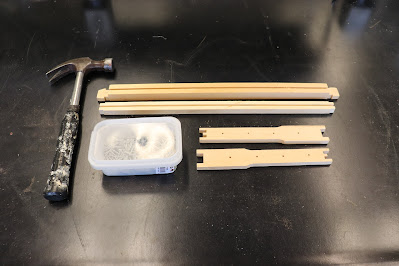
In all building projects, it is best to start by gathering the necessary materials. We have the top bar, bottom bar, and two side bars. It is good practice to use wire to support wax foundation in a frame. The three holes in the side bars will be used to add wire to the frame after it is assembled (see Figure 1). Plastic foundation does not require this additional support and, therefore, such frames do not need these extra holes. Our top and bottom bars both have a mid-groove to fit the foundation into place. Last, we have one-inch galvanized nails, and a hammer to fasten our pieces together. An optional but useful extra tool is a knife or a razor blade.

Figure 1. Materials for assembling a frame. A hammer, 1-inch galvanized nails, top bar, bottom bar, and two side bars. 

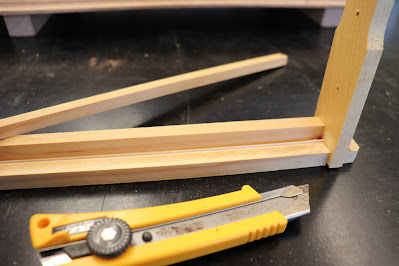
In addition to a groove, our top bar also has a piece called a cleat or wedge (see Figure 2). The wooden cleat is a removable piece that can be detached either before or after assembly. It can be sliced off with a razor blade or snapped off by hand. Either way, it is recommended to afterwards use a razor blade to clean up the edge of the top bar. This will make it easier to ultimately slide the wax foundation into place. 


Figure 2. Wooden cleat removed from completed frame. The razor bade will clean up the uneven break along the top bar.

Side bars have a distinct top and bottom, and the top is the wider end. To assemble the frame, press the top of the side bars into the top bar, and press the bottom bar into bottom of the side bars. The top width ensures that there is proper bee space between frames for bees to move about the hive and build comb. It does not extend all the way to the bottom to prevent the frame from being totally propolized and for ease of movement for the bees within. An unassembled frame should square up easily. 

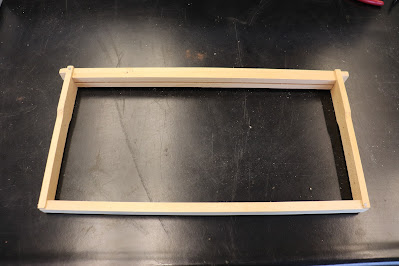
The final step is to secure the pieces together with nails (Figure 3). We used one nail in each corner. As a matter of preference, two nails are on one side and two are on the other. The nails are oriented perpendicular to the top bar make the frame sturdier in cases when you occasionally pry the top bar up with your hive tool to free the frame from sticky propolis and wax. 

Figure 3. Assembled deep frame. Includes four nails, two are hammered into the back and cannot be seen in this photo. 

The frame is now assembled, and next week we will add our wire and wax foundation to make it complete! This week we have some additional announcements!


Canadian Beekeeping Minutes

ATTTA has a new edition to our Canadian Beekeeping Minutes YouTube series! Click here to get tips on how to light your smoker!


Atlantic Beekeeping Survey

ATTTA and Dalhousie have created an educational survey to help us fully understand the needs and wants of Atlantic beekeepers, including future beekeepers! The survey is brief, and we are greatly appreciative to all participants. Take the survey here! Thank you to those who have!


Connecting with ATTTA Specialists


If you’d like to connect with ATTTA specialists or learn more about our program, you can:


Assembling a Hive Body

Thursday, 20 January 2022

This week’s blog continues our discussion of preparing for the upcoming beekeeping season. If you ordered bees to increase your numbers for next season, you will also need to be prepared with extra hive bodies. Hive bodies come in a variety of styles but in Atlantic Canada, and particularly for beekeepers engaged in the pollination industry, the Langstroth hive is standard. Read on to join ATTTA in the assembly of a standard Langstroth hive body!

Assembling a Hive Body

Large scale beekeepers in Atlantic Canada tend to make their own equipment to reduce costs. If you are considering scaling up, assembling your own hive bodies is a good place to start because it does not require advanced carpentry skills or specialist equipment. We recommend using 10-frame Langstroth hive bodies because they are most typical in Canada and therefore are the most accessible. The standard width and length for a Langstroth hive is 161/2” x 197/8”. They are available in various depths depending on preference and purpose. Brood chambers are typically deep (95/8”) and honey supers are commonly medium or shallow ( 65/8” and 53/4” respectively). Today, we will be assembling a deep hive body.

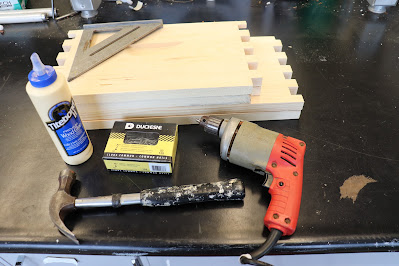
The first step is to gather your materials. Unassembled hive bodies are available at most local beekeeping equipment stores. Some come ready with predrilled holes in the finger joints and nails included. Ours did not, so we also have a box of 2” galvanized nails and a drill. We chose to use nails to construct our box, but screws or air gun staples are also appropriate depending on preference and access to tools.

Now we are ready to predrill our holes. Predrilling is not required but is recommended because it will help protect your wood from splitting, and the holes will guide your nails into position. Drill one small hole in the center of each finger, for a total of 40 holes to be filled with 40 nails. Another optional resource is wood glue. Wood glue offers additional binding strength to your corners and can act as a sealant to help keep out moisture, like human propolis! Add a thin layer of wood glue to the top and bottom of the fingers before joining them together. Glue can be easily spread using your finger, some scrap wood, or a popsicle stick.

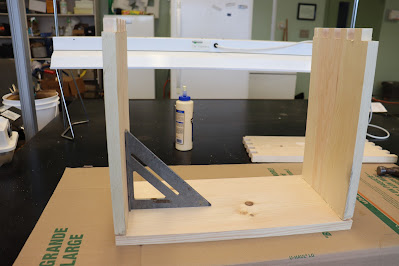
The next step is joining your corners and adding the nails. Start with one of the pieces flat on the table with the inside of the box facing up. Then add the first two sides, ensuring all of the handles are oriented in the proper direction and facing outwards, and place your fourth piece on top. You will need to apply some force to get the corners of the box flush and square. A rubber mallet can be useful, otherwise you can gently hammer or use your body strength alone if the joints are not too tight. It is good practice to check the sides and make sure they are square before you begin to add nails, and with precut walls the box will likely square up quite easily. Clamping of sides may also be helpful when you start out to ensure a good tight fit all around. 

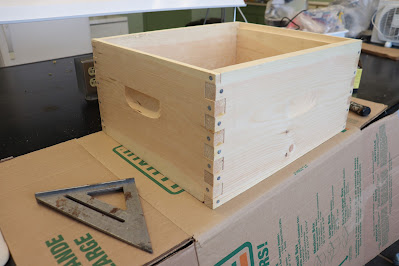
Once all four sides are in place and the box is good and square, you can begin nailing the sides together.  As an additional optional step, some beekeepers will nail the corners of the hive vertically to prevent warping.  The corners are the most important part of the hive to keep in place.  This ensures it remains square and the correct dimensions.  Outward warp of the corners will affect the alignment of supers, bottoms and covers. If you are building many hives, consider ear protection to block out noise. With all the nails in place and any excess glue removed, your hive body is complete and ready to paint! For more information about best practices for painting a hive, see ATTTA Blog #45!

Having extra hive bodies on hand is very useful in an apiary. They are necessary for housing bees and can also prove useful in pail feeding, catching swarms, making splits, concealing electric fence energizers. This past spring, Atlantic Canada had an early swarm season and beekeepers with hive bodies and extra equipment ready to go were in a much better position for swarm management. Planning ahead and preparing your hive bodies in the winter is a good beekeeping practice. This is especially important given the realities of COVID-19, as supply-chain issues may impact access to beekeeping equipment and other materials, including lumber. 


Connecting with ATTTA Specialists


If you’d like to connect with ATTTA specialists or learn more about our program, you can: