
In today’s blog, we will be discussing another important
piece of hive equipment to prepare for the coming season - frames! Frames of
some variety have become essential to modern day beekeeping. Removable frames
allow for hive inspections which are valuable for pest and disease monitoring
and, in Canada, are the law in beekeeping. Today, join us in assembling a deep
frame, to fit the deep Langstroth hive body we assembled previously.
Frame Assembly
When organizing frames for the upcoming season, you first must
ask yourself what kind of frame you would like. Frames for Langstroth hives
come in different sizes and materials. Shallow frames fit shallow supers,
medium frames fit medium supers, etc. Frames can be wooden or plastic. In
Atlantic Canada, it is most typical for frames to be wooden with either plastic
or wax foundation in the midrib. Frames which are one piece and completely
plastic are also available but, anecdotally, less hardy. Frames can be bought
assembled with foundation in place, unassembled, or you can start from scratch.
Today, we are assembling a wooden frame which is intended for wax foundation.
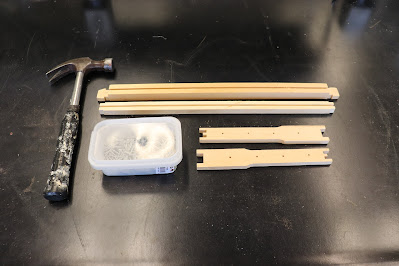
In all building projects, it is best to start by gathering the necessary materials. We have the top bar, bottom bar, and two side bars. It is good practice to use wire to support wax foundation in a frame. The three holes in the side bars will be used to add wire to the frame after it is assembled (see Figure 1). Plastic foundation does not require this additional support and, therefore, such frames do not need these extra holes. Our top and bottom bars both have a mid-groove to fit the foundation into place. Last, we have one-inch galvanized nails, and a hammer to fasten our pieces together. An optional but useful extra tool is a knife or a razor blade.
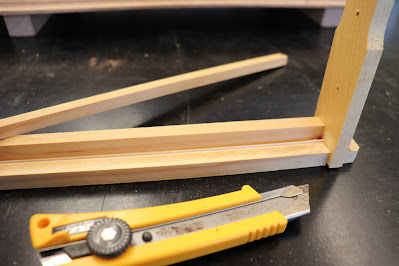
In addition to a groove, our top bar also has a piece called
a cleat or wedge (see Figure 2). The wooden cleat is a removable piece that can
be detached either before or after assembly. It can be sliced off with a razor
blade or snapped off by hand. Either way, it is recommended to afterwards use a
razor blade to clean up the edge of the top bar. This will make it easier to ultimately
slide the wax foundation into place.
Side bars have a distinct top and bottom, and the top is the
wider end. To assemble the frame, press the top of the side bars into the top
bar, and press the bottom bar into bottom of the side bars. The top width
ensures that there is proper bee space between frames for bees to move about
the hive and build comb. It does not extend all the way to the bottom to
prevent the frame from being totally propolized and for ease of movement for
the bees within. An unassembled frame should square up easily.
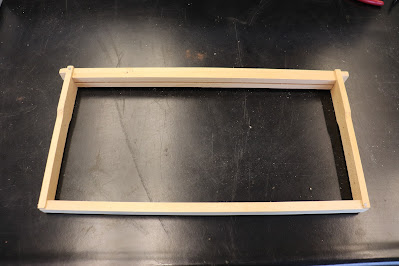
The final step is to secure the pieces together with nails (Figure 3). We used one nail in each corner. As a matter of preference, two nails are on one side and two are on the other. The nails are oriented perpendicular to the top bar make the frame sturdier in cases when you occasionally pry the top bar up with your hive tool to free the frame from sticky propolis and wax.
The frame is now assembled, and next week we will add our
wire and wax foundation to make it complete! This week we have some additional
announcements!
Canadian Beekeeping Minutes
ATTTA has a new edition to our Canadian
Beekeeping Minutes YouTube series! Click here to get tips
on how to light your smoker!
Atlantic Beekeeping Survey
ATTTA and Dalhousie have created an educational survey to
help us fully understand the needs and wants of Atlantic beekeepers, including
future beekeepers! The survey is brief, and we are greatly appreciative to all
participants. Take
the survey here! Thank you to those who have!
Connecting with ATTTA Specialists